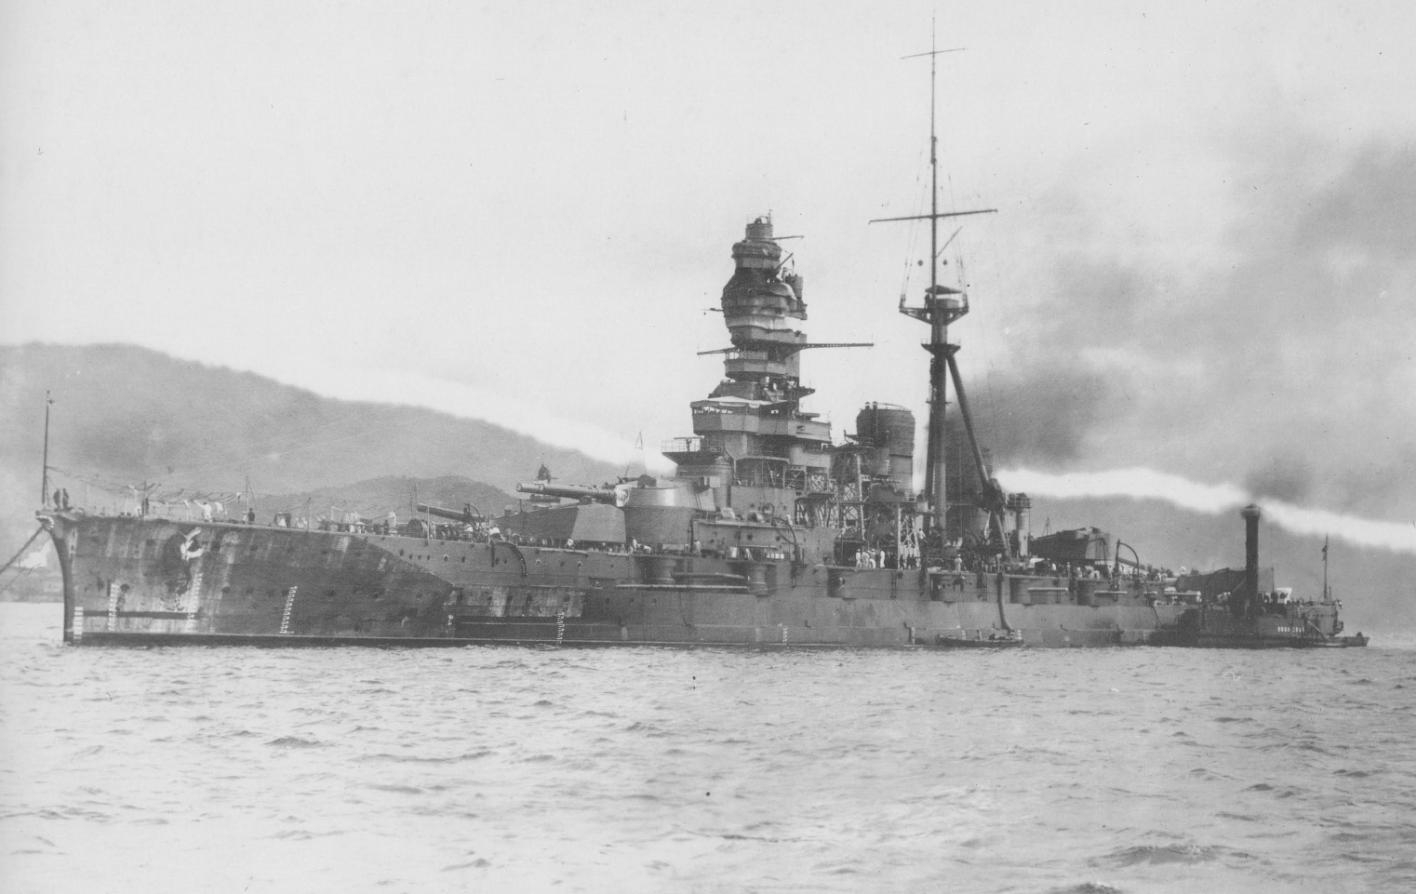
There were only two battleship vs. battleship actions in the Pacific during World War II. Kirishima's duel with Washington and South Dakota on 14-15 November 1942 was the first of these actions. This pitted two of the most modern and newest US battleships against one of Japan's oldest battleships. What has been written about her final hours has largely been taken from a single USSBS Interrogation of Lt.Cdr. Tokuno Horishi. In this report Horishi writes that Kirishima received nine 16-inch shell hits and forty 5-inch shell hits and that Captain Iwabuchi had Kirishima scuttled. The estimate of nine major caliber hits was consistent with Admiral Lee's estimate of eight 16-inch shell hits documented in his action report to Admiral Nimitz. There however was no information on the location of these hits or the damage suffered. There was no information on what attempts were made to save her after the battle if any. Kirishima's story is still largely a mystery though she plays a huge role in the most important battle of the war.
Many Japanese records were destroyed when Tokyo was fire bombed in 1945 by US air raids. Japanese commanders would file a brief action report soon after the battle and then a detailed action report maybe a month later. The detailed action report for Kirishima seems to have been lost. Pieces of the battle from the Japanese side have had to come from a wide number of sources including some brief action reports from Kirishima, Takao, Sendai, detailed action report from Atago, surviving officer testimony post war, and Japanese secondary sources written on the subject. The most important piece of new evidence was supplied by Lt.Cdr. Shiro Hayashi who was Kirishima's Chief Damage Control Officer and before the ship sank he sketched a drawing of the hit locations suffered by his ship. Lt.Cdr. Tsurukichi Ikeda was his good friend and when they were about to abandon ship Ikeda copied these hit locations meticulously and published it post war in a small Japanese book Shikikan-tachi no Taiheiyô Sensô [Pacific War as Described by the Senior Officers]. What was reported was vastly different then Horishi's account. Ikeda shows 20 major caliber hits and seventeen smaller caliber hits and that Kirishima actually capsized to port despite all the gunfire damage striking the starboard side of the ship totally unexpectedly while they were in the process of abandoning the ship in an orderly fashion.
Then in 1992 Dr. Robert Ballard discovered Kirishima's wreck and was shocked to see her upside down with her forward section completely destroyed and her forward anchor chain draped over the stern. Dr. Ballard gave me permission to view all the film taken of Kirishima on his expedition. My examination of what the film shows confirms Hayashi's and Ikeda's account. Unfortunately, when it was discovered she was upside down, Dr. Ballard decided not to film the entire wreck and so not all hit locations were caught on tape and two hits are only partially filmed as the camera moves right past them, including one which was hidden by the anchor chain over her stern. With this new information in hand, the following essay is composed of the following sections:
- A technical description of her officer testimony as given to the USSBS
- Kirishima's original armor protection scheme and additions to that scheme
- Damage she suffered during the battle
- The causes of her sinking
- My theory on why her wreck is in its current condition
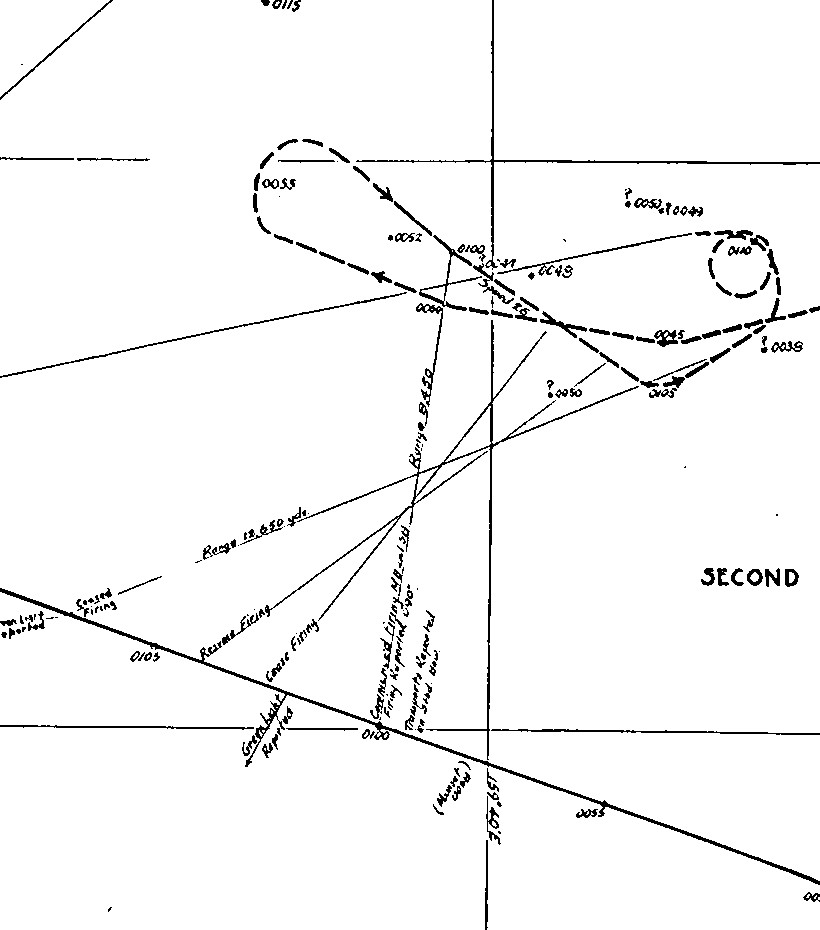
USS Washington was the only ship to fire at Kirishima with both her main and secondary battery. The detail is taken from her track chart which shows the critical time period Washington fired on Kirishima. According to Washington's action report she is on a heading of 290 degrees true and Kirishima is on a course of 130 degrees true. After Kirishima's turn North at 0105 she presents her port side to Washington and I believe this plays an important roll in her rudder damage. USS South Dakota's main battery was silent during this phase of the battle and her secondary guns engaged Atago.
At 0100 when Atago turned on her search lights USS Washington main battery opens fire bearing 008 degrees true, range 8,400 yards. Secondary battery opened fire. Director 1 with mounts 1 and 3 on main battery target. Director 3 with mounts 5 and 7 firing on ship probably CA with search lights trained on South Dakota. Director 4 provided star shell illumination with mount 9 for main battery beginning after second salvo for a total of 62 star shells being fired. Fire was rapid for about two minutes thirty nine seconds, firing about thirty nine 16-inch projectiles. Main caliber fire was checked for one minute thirty seconds on an erroneous report target had been sunk. The main battery hit battleship with at least three salvos with projectiles exploding during the first two minutes thirty nine seconds.1 Fire was resumed for two minutes forty five seconds in which thirty six 16-inch projectiles were fired for a total of seventy five main caliber rounds and 107 5-inch AA common rounds between 0100 and 0107. There is no record of the number of salvos fired by Washington during this time period. Hank Seely in spot one witnessed Washington's main battery gun fire hit the Pagoda superstructure on her second salvo and then on the third strike Kirishima amidships causing large bright explosions. Washington's action report states that she achieved hits on at least three salvos during the first two minutes and thirty nine seconds. During the one minute and thirty seconds Washington checked fire it was observed that Kirishima was still able to fire from three gun turrets which is an important observation. When she resumed it was noted that more hits were obtained and that only turret 4 was able to return fire. Washington walked her gunfire across her target and noted she was turning to the north. At 0107 Kirishima pulled off to port and made a 500 degree turn or about one and a half complete circles in that direction. Though Washington would track Kirishima for ten more minutes, she never re-opened fire on her and soon left her behind, leaving Kirishima to her fate.
Washington also reported that during this phase “overs" as well as shorts were observed optically, however, during this the time no splashes were observed by the fire control radar even though a particular attempt was made to do so. The reason for this is not known. It may be that the battleship signal was so strong that receiver sensitivity had been cut too low to see the splashes. On the other hand, the other nearby targets and Savo Island itself could have confused the return signals. This means that Washington's estimate of hits scored was based on what she could see and not based on counting the shell splashes by her fire control radar.1
Concerning Washington's secondary battery fire, Group one, which was firing on the main battery target, was observed twice to score hits that started fires in upper works of the target and when the search lights on this target were extinguished and other ships turned on their search lights, fire was shifted to the new targets. During this phase 107 AA common projectiles were fired at Kirishima. The 40 estimated hits claimed by Lt.Cdr. Tokuno Horishi would be an incredible 37% hit ratio of this number, which is simply too high to be accurate. The 5-inch battery is firing at mid-range for their caliber with a much higher angle of fall (about 20 degrees) than was the main battery (about 7 degrees). The flatter the trajectory, the easier it is to score hits and Washington is firing nine 16-inch guns vs. only four 5-inch guns at Kirishima. Lee also documents that Group One's fire hit the enemy battleship and that both the main and secondary battery had scored hits prior to Kirishima's firing her first salvo at South Dakota. Concerning the type of projectiles fired at Kirishima, Lee notes that the 5-inch 38 caliber AA Common were without base detonating fuzes and so could be expected to give only about 50% high order bursts against surface targets, and that these rounds would burst at the point of impact without deeply penetrating into the target ship. His comment on the 16-inch AP shells was that they were very effective against large targets, but were apt to go clear through the superstructure of small vessels before detonating.2 This was common for AP rounds as the thin steel in the superstructure did not provide enough deceleration to activate the fuze.
In two brief action reports, one of which is on microfilm at the National Archives and one that is from Ukagi's diary, we gain only a small amount of information on the damage inflicted on Kirishima. The first report simply states; "Many hits were sustained and fires broke out in all departments. Considerable flooding occurred and steering became impossible".3 The second report points out that South Dakota was identified as a "North Carolina class" battleship and that Washington was identified as an "Idaho class" battleship. It also states enemy gunfire was concentrated on Kirishima and inflicted more than 6 hits. Fires started at various sections while the fore radio room was destroyed, hydrometers of number 3 and 4 turrets stopped and the rudder developed trouble. Her engine rooms remained operational for a time but her steering gear room was completely flooded so making way was impossible. Eventually the engine rooms became intolerable due to increased heat and most of the engineers were killed even though they had been ordered to evacuate. Only the central engine room could make way but only at the slowest speed. Fires once thought under control gained strength and threatened the fore and aft magazines. Orders to flood them were issued. Requests for a tow to the light cruiser Nagara were denied and attempts to prevent the flooding of the steering gear room also failed and the ship became hopeless. Then we gave up the ship and asked destroyers Asagumo and Teruzuki to come along side to transfer the crew. We lowered the ensign and shouted three banzais. The Emperors portrait was transferred first to the Asagumo and then the crew were transferred. The list grew so that we could hardly stand on deck without help. The ship finally went down at 0125 (Japanese time, 0325 local time) at a point eleven miles bearing 265 degrees from Savo Island. Sixty nine officers and 1,031 men were rescued by the destroyers.4 Japanese documentation reports that the first hits struck forward, smashing both forward main gun turrets and after a short lull she was hit aft.
The brief action reports were never meant to give full details, but were simply a summary to provide superior officers with a general idea of what had happened. The Detailed Action Reports or DARs were meant to give full details but it appears that Kirishima's was lost during the war. However, these brief action reports do provide important clues to back up officer testimony and other secondary source material.
Post war, three officers gave accounts of Kirishima's final hours with far greater detail. Lt.(jg) Michio Kobayashi was Kirishima's supply officer, but during the battle he was stationed on the battle bridge with the ships senior officers.5 Lt.Cdr Kyshichi Yoshino was Kirishima's chief flooding control officer who describes his attempts to keep the ship on an even keel.6 Lt.Cdr. Tsurukichi Ikeda preserved and provided the most important data and that was Lt.Cdr. Shiro Hayashi hit locations.7 Concerning Kirishima's battle damage, here are the details each officer documented.
Lt.Cdr. Tsurukichi Ikeda was in charge of Kirishima's secondary battery and was also Lt.Cdr. Tokuno Horishi senior officer. He could see his gunfire hitting South Dakota and was sure that Kirishima was illuminating the target as well. He felt only a strange vibration and had no idea that his ship was hit. However, he soon he felt his back getting hot so he thought there might be a fire in the next compartment. When he was ordered to the upper deck he witnessed massive destruction on the compass bridge level and once on deck he moved aft and saw two ten meter holes over his secondary guns. He also reported that once on deck he noticed a starboard list and in the end Kirishima capsized to port. Ikeda's copy of Hayashi's drawing showed 20 major caliber hits and 17 secondary hits.
Lt.(jg) Michio Kobayashi said, "Washington's first salvo was a straddle." He then received reports that the hemp rope "mantelets", protecting the vicinity of the first funnel and search lights had caught on fire. Then he heard a report through voice pipes about fire in aft secondary battery turrets. The XO Commander Koro Ono ordered the aft magazines flooded and soon came a report via voice pipe confirming that this measure had been successfully executed. Kobayashi had felt several successive impacts but was not sure they came from shells or torpedoes. New reports came into Kobayashi of rudder failure, fires in the forward main battery turrets and aft secondary battery casemates and then machinery breakdowns. He estimated Kirishima had been hit by 20 major caliber rounds and at least 10 secondary rounds. He also describes how Kirishima keeps shifting from one side to the other and that each time she lists to one side the XO orders the opposite side counter flooded in an attempt to correct off center flooding. At first this seemed to work but later had no effect and Kirishima which was then listing to starboard continued to list so that standing on the bridge became impossible. He also states that in the end Kirishima capsizes to port.
Lt.Cdr. Kyûshichi Yoshino, Kirishima's flooding control officer at his station below decks he could feel the ship shudder below his feet every time when hit. Temperature within the compartment had reached 45 degrees Celsius (113º F) telling us how hot it was below decks even before the ship caught fire. He notes getting reports about several fires forward and aft and notes she soon developed a starboard list. Then he received a report of flooding in the starboard outboard engine room and then an urgent order form Captain Iwabuchi to flood the magazines to turret one. He tried to keep the ship on an even keel but was not sure his efforts did any good.
Captain Iwabuchi wanted to beach Kirishima using the destroyers or Nagara's help to tow his wounded ship. Destroyers did attempt to tow her but she would not move and the Captain of Nagara refused to help tow her. Captain Iwabuchi then attempted to steer Kirishima using just her engines but this failed. He sent divers to the steering compartments, but they were unable to get past the watertight scuttles. The first report of rudder trouble had the rudders jammed at 10 degrees starboard. Fires were brought under control by 0149 however the engine rooms had to be abandoned due to heat and smoke being swept down by her supply ventilation. Though he was trying to save his ship Kirishima was not responding and as she rolled from side to side each time the list was more serious than before. The XO eventually suggested it was time to abandon ship which he agreed and sent word to the destroyers to come along side.
The Japanese had a very specific way on how to abandon a ship. First the Emperor's portrait, followed by the wounded, and then the rest of the crew by division. Iwabuchi and his crew followed this doctrine, however, as time went on the starboard list grew so bad that standing on the upper deck became impossible. Iwabuchi ordered the port engine room flooded to correct this list. This is when Kirishima, with 300 men still on board, begins to shift suddenly to port and lurches with her bow rising and then capsizes to port, almost crushing Terizuki in the process and throwing the last 300 men into the water. This was totally unexpected and is inconsistent with the report that Iwabuchi scuttled his ship.
Ikeda's sketch of her damage is probably the most important new piece of evidence as to Kirishima's damage. The 20 major caliber and 17 secondary caliber hits is far more consistent with what may be expected by the number of major caliber shells and secondary shells fired at their respected ranges. In addition all the hits that struck the ship below the waterline would have been observed by Washington as a miss due to the shell throwing up a splash. Some hits so close together may have been observed as single hits so the 8-9 hits viewed optically becomes a realistic estimate but falls short of actual damage.
The documentation and officer testimony brings up some important questions.
- Based on Ikeda's sketch and her official blueprints what was actually hit and do these locations correspond to the documentation and testimony?
- Why would a ship with rudders jammed at 10 degrees to starboard make a 500 degree turn to port?
- Why would a ship which took most of her damage to starboard keep shifting from the starboard list to port and then back to starboard and keep repeating this trend until she finally capsizes to port?
- Where the damage control efforts made after the battle the correct actions to take and did they help or hurt in the effort to save her?
- Was the reason she was lost directly due to the gunfire damage and her design concepts or was she really scuttled?
The answers to these questions have only become clearer in the past two decades. In 1992 Dr. Robert Ballard found the wreck of Kirishima and his filming of the wreck provided the final pieces of evidence to confirm what happened to her. First, she was discovered to be upside down and the forward half of the ship appeared to have been destroyed by a massive explosion. She had the bow anchor chain draped across her stern and her port rudder was jammed almost sideways, but her starboard rudder was indeed jammed about 10 degrees starboard. More importantly, three 16-inch shell hits were either fully or partially caught on film in the exact locations Ikeda said they would be. Unfortunately, the wreck was not filmed completely and other hits are buried in the mud due to her being capsized.

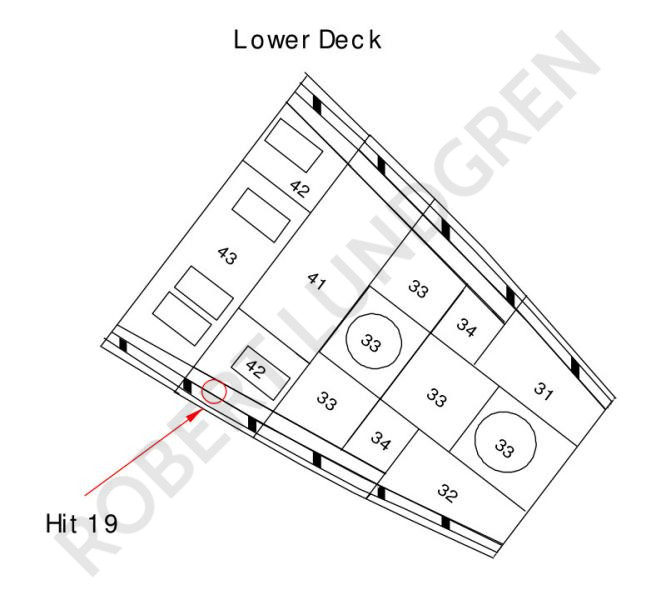
There is not much information concerning the secondary hits other than Washington's documentation that her fire did hit the battleship. We have Kobayashi's statement that fires were started around the forward stack and that her searchlights were destroyed so group A-E seems to have occurred. Hits K, L, and M are very close to Ikeda's position during the battle and he did make the comment that the plates to his back were getting hot a possible indication of a fire. There is no information on hits F-I or J, N, or O. Hit P would have struck the ships sickbay and hit Q would have struck crew quarters. Washington's first main caliber salvo was observed to be a straddle by both the US and Japanese officers. No hits are recorded for this salvo.
This large caliber hit is the only hit clearly in the pagoda superstructure and is in the location of the compass bridge and the forward telegraph room. This was the first hit observed by Hank Seely on Washington's second salvo and what Ikeda described on the third bridge level a scene of total destruction. This hit is also documented in her brief action report. This was the only hit observed for the second salvo.
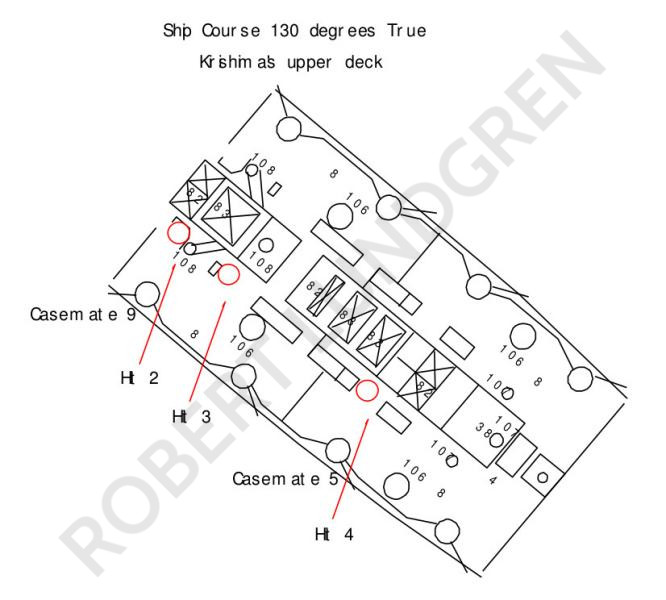
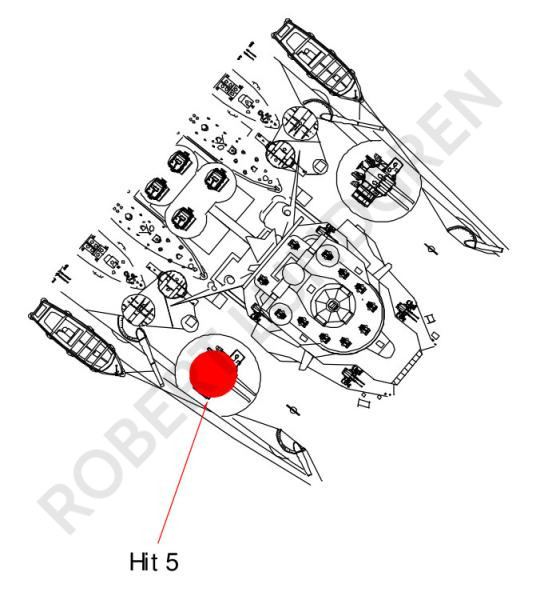
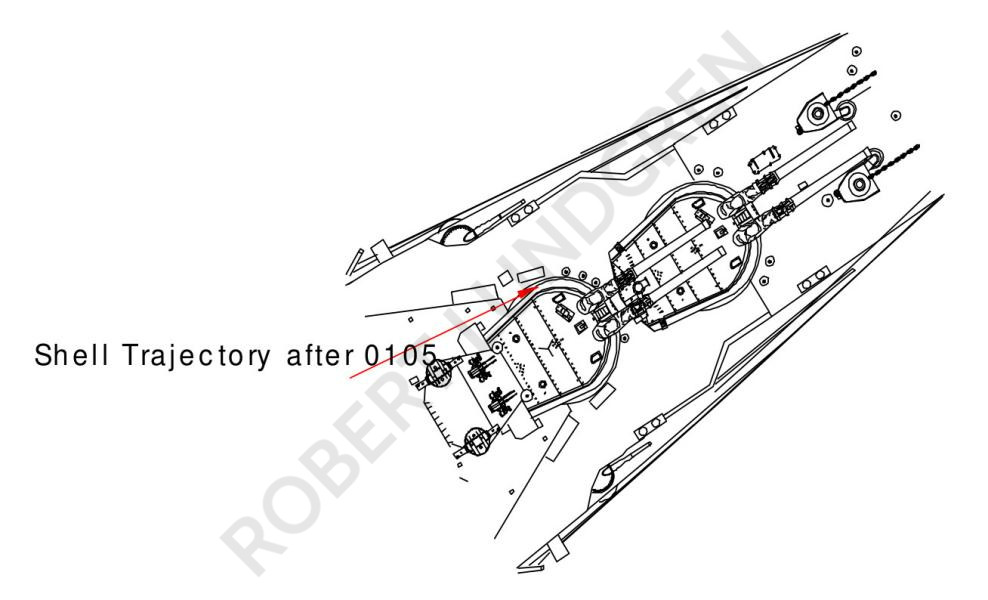
These play the most important role in why Kirishima was lost. Ikeda observed two ten meter wide holes in the deck right above his secondary guns as he moved aft in all likelihood these were hits 2 and 3. Holes thirty feet in diameter hint on how violent these explosions were and both strike very close to casemate mount 9. Hit 3 struck close to casemate mount 5. Hit 4 would have struck at the base of the pagoda superstructure in the approximate position of the forward 5"/40 gun mount. The drawings below are turned to reflect Kirishima on a course of 130 degrees and the shell trajectory matches Washington's course, position and firing angle during the first two minutes and 39 seconds. Hank Seely noted that on Washington's third salvo Kirishima was hit amidships, causing large, bright explosions.
The damage done by hits 2, 3, and 4 is very significant in that after penetration of the 149 mm casemate armor the shells would detonate very close to her forced draft supply ventilation for her machinery compartments (number 82). In addition, hits 2 and 3 threaten the aft secondary magazines through ammunition scuttles (number 41) on the lower deck and fires can sweep across to the port side as well, which would detonate the ready service ammunition for the casemate battery. The upper deck would have been set ablaze. Lt.(jg) Michio Kobayashi first heard reports about fire in aft secondary battery casemates. The XO Commander Koro Ono ordered the aft secondary magazines flooded.
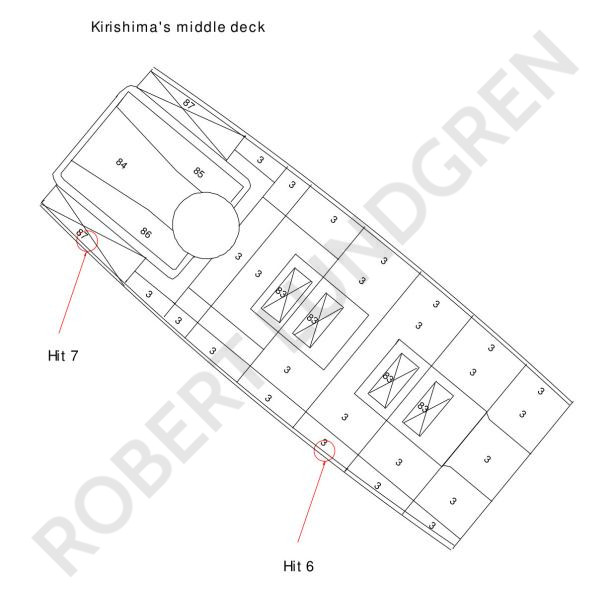
Lt.Cdr. Kyûshichi Yoshino first received reports of fired both forward and aft and then progressive flooding in the starboard engine room and this was prior to the emergency order to flood turret one magazine. Hits 6 and 7 both struck below the waterline and would have been observed by Washington as misses. There is partial film on the wreck showing hit 7. The expedition did not film the entire starboard side, so hit 6 was not filmed. These two hits would open both the middle and lower decks due to the armored slope. Hit 6 is by far the more damaging hit because it opens the middle deck with its large compartments which would allow flooding across the ship from starboard to port, which is again documented in that the ship kept shifting from starboard to port and then back again. On the lower deck her side protection kept any fragments from entering the boiler rooms. Hit 7 would have struck a large fresh water tank (number 87). The starboard engine room on the lower deck only reported progressive flooding and this water tank may have played a role in stopping fragments and contributing to this flooding. The engine room remained operational until fires being swept down through the ventilation forced it to be abandoned.
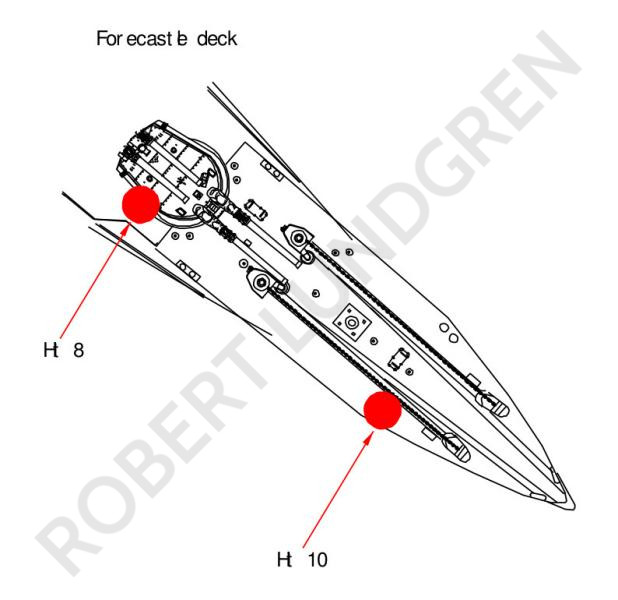
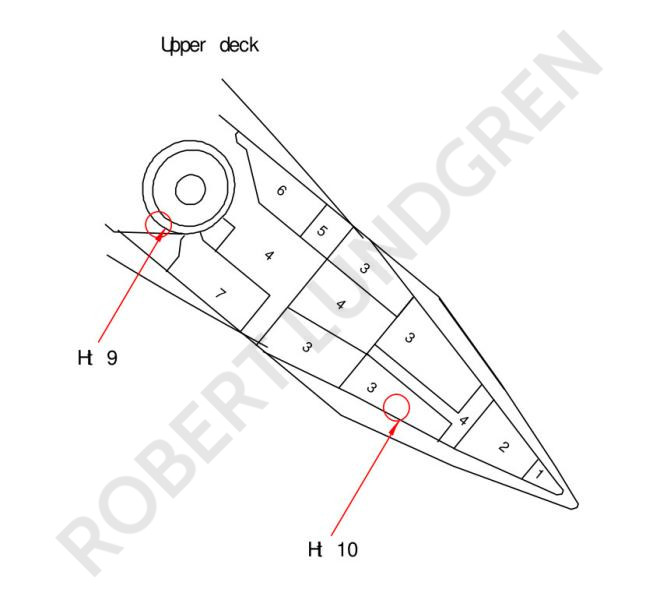
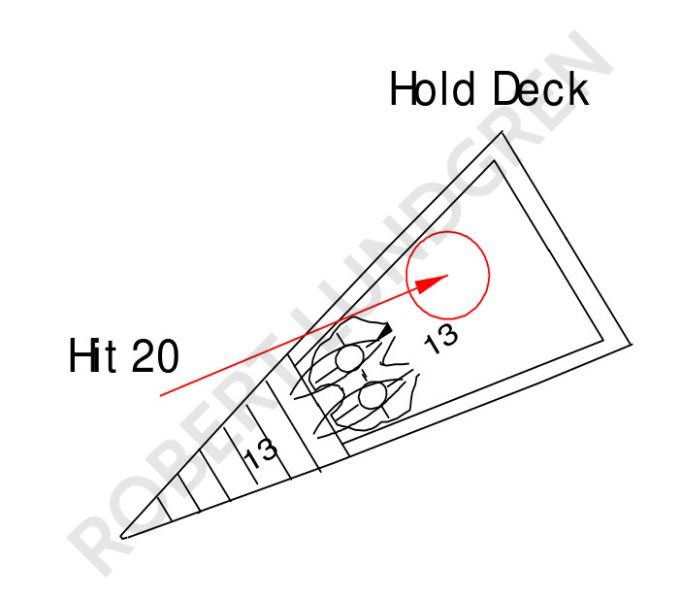
By Washington's fourth salvo, the range has dropped to roughly 7,850 yards and the target angle is approximately 5 degrees as the two ships pass each other in opposite directions. Hits 8 and 9 are again very close together and probably struck turret one simultaneously. For that reason, it would have been difficult for the crew to distinguish these as separate hits. Turret one's destruction must have been quite dramatic as it prompted Captain Iwabuchi's emergency order to flood the magazine for this turret. One simple deduction would be that both forward turrets were smashed. Neither of these forward turrets had any upgrade in armor protection, unlike turrets three and four which both received 124 mm VC plating below the forecastle deck in addition to the original 75 mm VC plate.
Based on Hayashi's drawing, hit 8 may have struck the barbette above the forecastle deck or hit the deck first and then struck the barbette on the after section of the barbette. Hit 9 penetrated between the forecastle deck and upper deck and would have passed through the 149 mm VC casemate armor that angles to the center of the barbette and then through a 75 mm VC plate. The armor protection in this area is too thin to stop the projectiles. Hit 10 may also have struck the forecastle deck and then penetrated the 38 mm NS deck plating to enter crew quarters and passage ways.
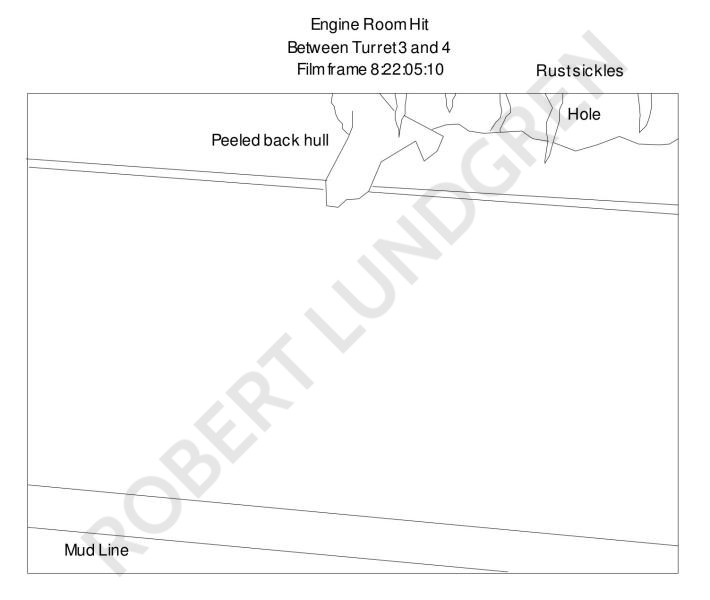
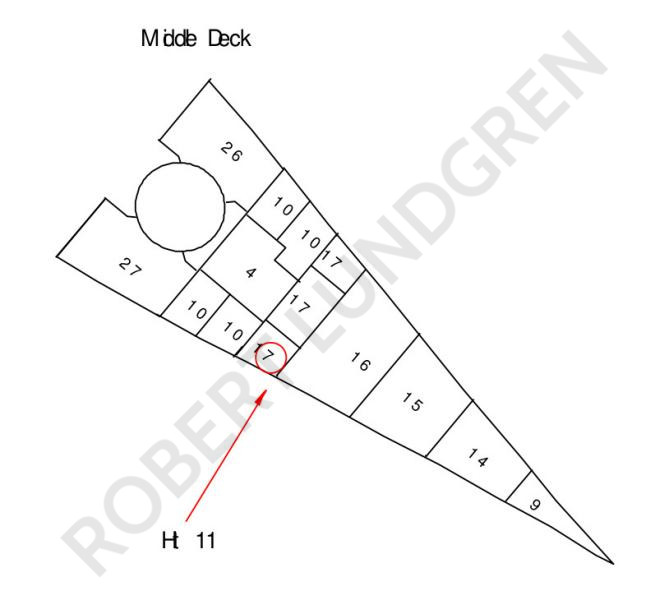
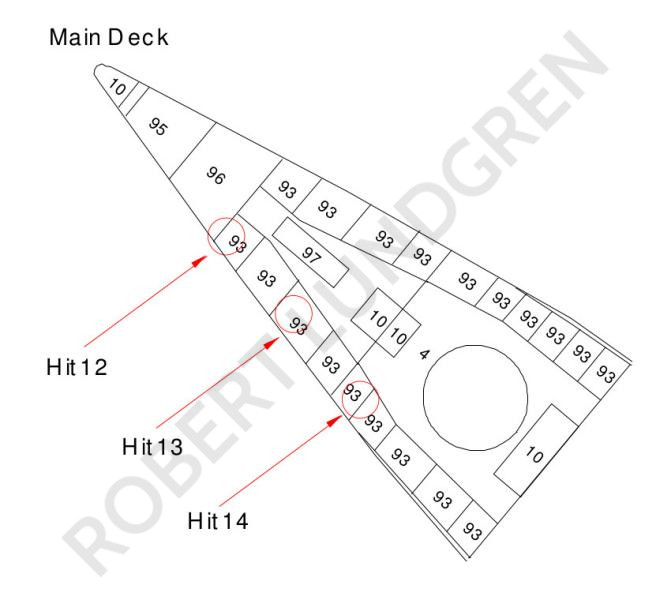
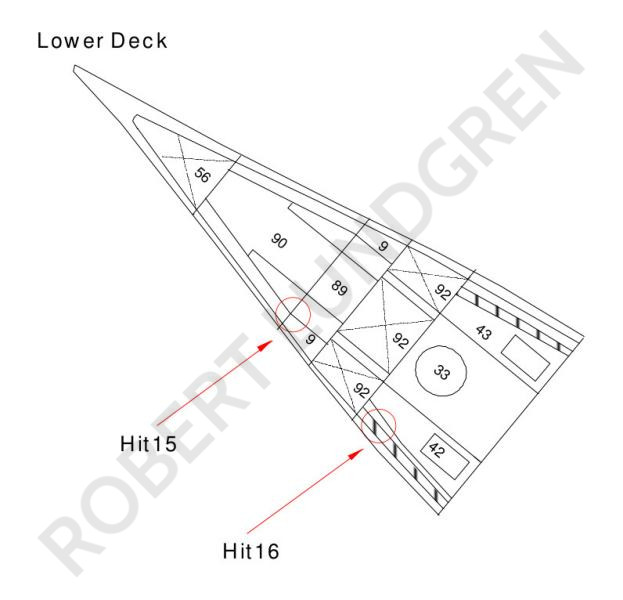
Hits 12, 13, and 14 would have ripped through officer cabins, passageways and the admiral's saloon. Hit 15 is partially shown in the film of the wreck. The shell hit the 75 mm belt just below the waterline and the resulting damage contributed to the progressive flooding of the rudder control room (number 89). This would result in the loss of electrical power to the rudders so they stopped at 10 degrees starboard. The painting in Bob Ballard's book of the wreck showing the aft 3-inch plate missing is not accurate as the plate is still there. The painter used a photo of Kongo's launch as a reference for his painting and in this photo the 3-inch belt had not yet been installed so it accidentally was incorporated into the painting. A full view of Hit 16 is shown in the film of the wreck. This shell passed through the outer bulge and into the main belt penetrating to the starboard aft hydraulic pump room (number 42) which will contribute to turrets three and four going silent due to a loss of hydraulic pressure.
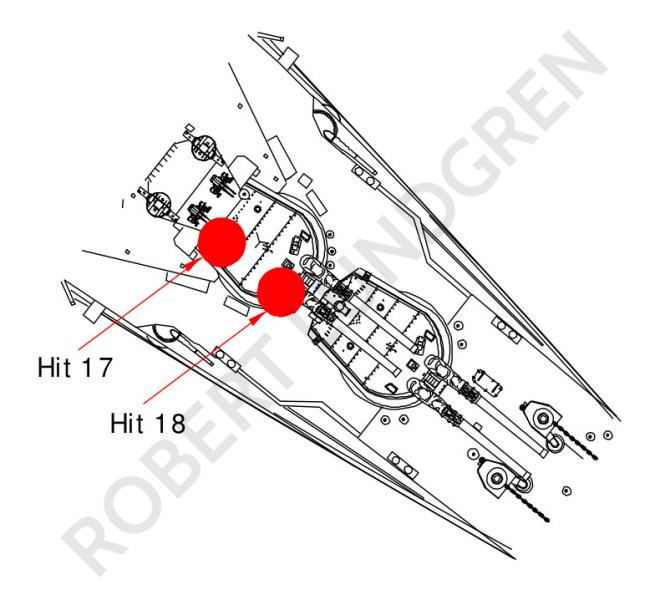
The timing of the destruction of turret two is not known. Based on Washington's observation that Kirishima was still able to fire from three gun turrets after she ceased fire, it would appear that one of the forward turrets survived until Washington resumed fire at 0104. Kirishima will only present her starboard side from 0100 to 0105 because by 0106 she has turned north and presents an extreme oblique target angle for her port side. Then the best timing of turret two being hit is around 0104 or when Washington resumed fire. Still on a course of 130 degrees true hit 17 would have passed through the shelter into the rear half of the barbette and hit 18 would have hit the forward half of the barbette. The Japanese document both forward turrets as being destroyed by gunfire, so at least one and in all likelihood both shells penetrated the barbette. Hit 19 landed short and struck the forward hydraulic pump room on the starboard side (number 42). Kirishima had three such pump rooms the third is on the port side a little farther aft (also labeled as number 42). Kirishima should be able to operate her turrets with two pump rooms. The British had earlier found that HMS Invincible which had a total of two pump rooms could not operate the turrets if one was damaged. For this reason, the British had three pump rooms incorporated in all later battlecruisers to give some redundancy. With the loss of both starboard pump rooms on Kirishima and the documentation that both turret three and four went silent due to a loss in hydraulic pressure, turret two was probably lost when she was still presenting her starboard side.
After 0105 the shell trajectory is very oblique, making it unlikely that either forward turret was hit after she turned north. There is no documentation that she received direct hits on the port side. Washington documents her second salvo after she resumed fire as a short straddle. She then simply states she walked the patterns across the target, being able to see both shorts and overs. If turret two was lost before she turned north and then turret three lost hydraulic pressure first because it is physically higher than turret four what Washington observed would still be accurate.
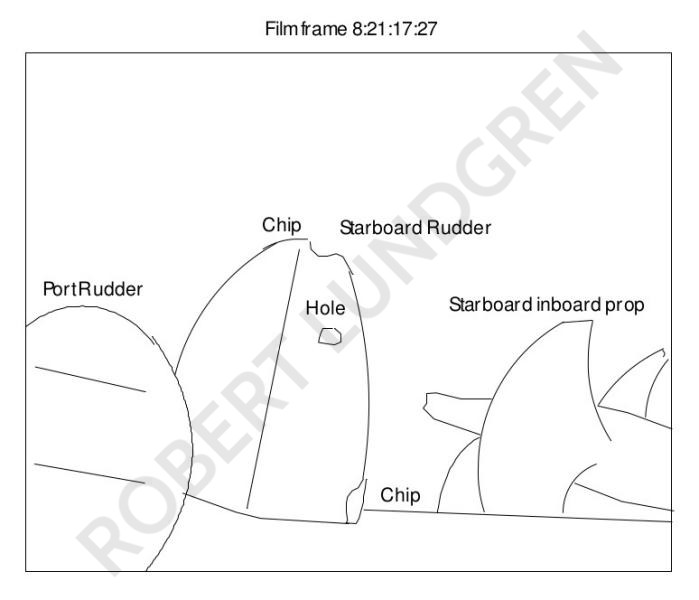
Hit - 20 was placed on her rudder itself. At 0107 Kirishima was documented as turning to port in a 500 degree turn before she stopped. Why would a ship turn to port if her rudders are jammed at 10 degrees starboard? Her wreck shows her starboard rudder is at 10 degrees starboard just as her officers documented. This 10 degrees to starboard is bringing the ship on a steady course after her port turn to the north when the control room floods and looses power.
The port rudder however is turned almost 80 degrees inboard. Normally her rudders could only turn 30 degrees off center so this 80 degree turn represents a massive jam and with her starboard rudder only off center by 10 degrees the water trapped by the port rudder would pull the ship to port. So what may have happened to cause this type of jam? One theory would be at 0107 as Washington fires her last salvo as Kirishima is presenting her port side to Washington. This salvo of shells fall around her stern and one shell manages to come under her keel behind the rudders and forward of the inboard propellers and detonates. The shock of the explosion hits the rear of the port rudder and slams it to 80 degrees starboard. The shock under her keel breaks the seals and the rudder machinery room floods and the watertight scuttles to these compartments jam. In addition, there is evidence of shrapnel damage to the starboard rudder with one fragment penetrating, chips out of the top and at the base at the rear of the starboard rudder. Surprisingly, there is no good film of the port rudder, it simply looms in the darkness. You can tell that it is jammed, but there is not enough light to see if it suffered any shrapnel damage.
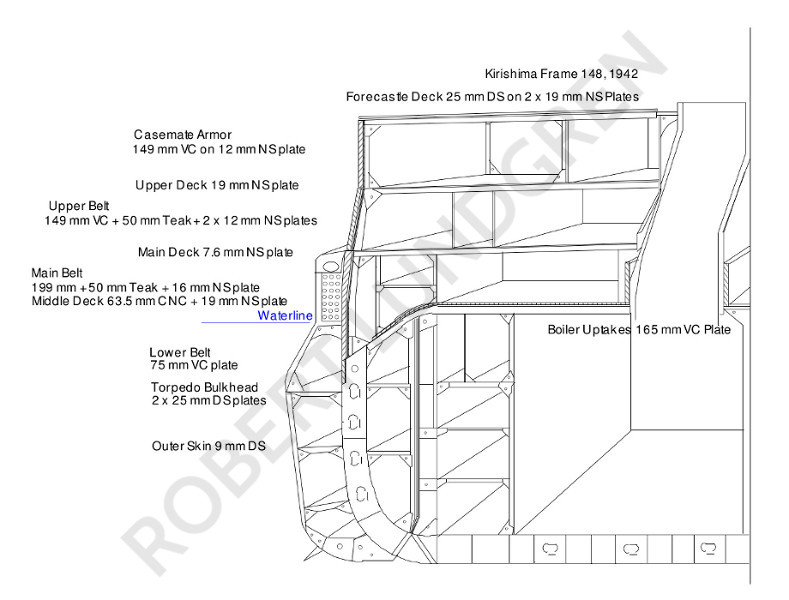
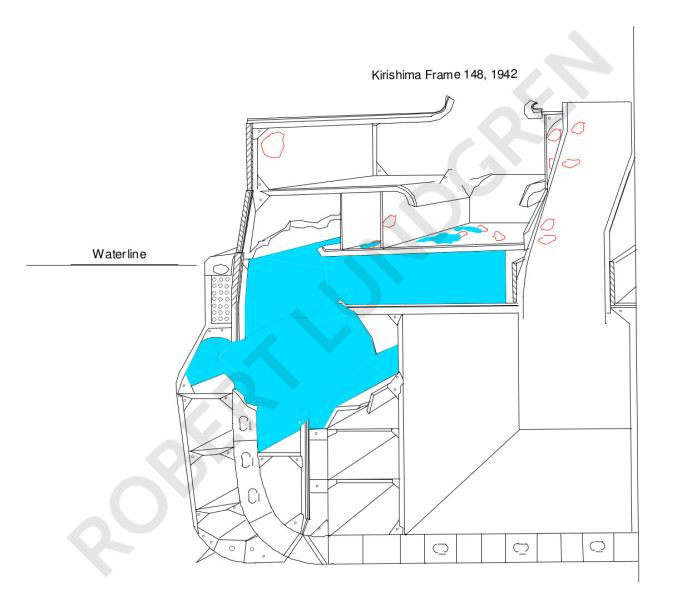
This first cross section is at frame 148 of Kirishima as she was after she was modernized and shows her basic subdivision and armor protection. Her side armor largely remains the same and the Japanese focused on increasing torpedo protection and added some deck protection to the middle deck. Her main belt was not designed to protect her machinery but to protect her buoyancy at the waterline. It is far too narrow to protect her machinery and is there to keep the middle deck dry.
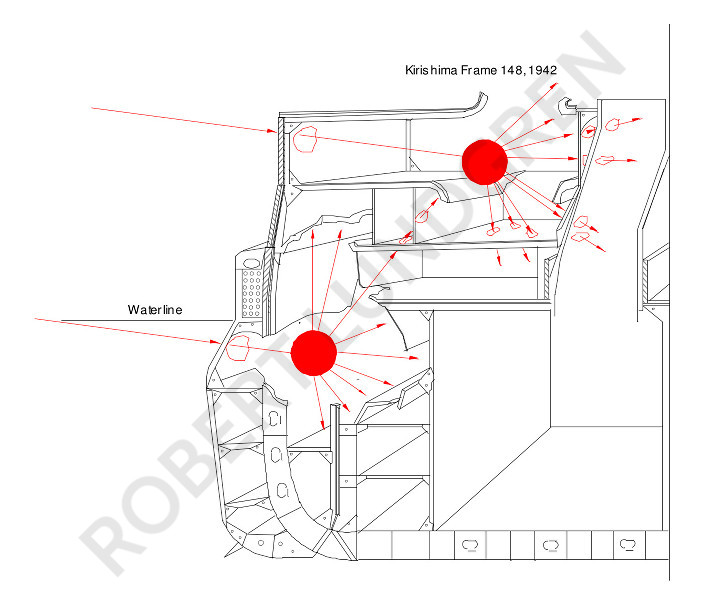
The next cross section shows how devastating the amidships hits would be in breaking her watertight integrity to the decks normally above the waterline. Kirishima's original protection scheme was never based on projectiles with deep penetration capability. In 1914 all that was expected from an AP shell was to punch a hole in the exterior plate. These projectiles exploded on impact using a very sensitive explosive filler of picric acid and a non-delay fuze. They posed little risk to the ship below the waterline as any shell would destroy itself on impact with the water. Thus in 1914 all major watertight compartments only went up to the middle deck which is located at the waterline. The decks normally above the waterline have huge compartments which allow the crew to move through the ship. By 1942 advances in shell technology allow projectiles to have deep penetration capability before they detonate. Her exterior armor too thin to stop penetration only ensures proper fuze action. Hit 6 striking just short of her hull passes through the lower edge of her main belt and breaking the tip of the armored slope and detonates under the slope probably when the shell struck the torpedo bulkheads. This devastates the middle deck above opening it to the sea. Kirishima is largely liquid loaded below the waterline amidships and the fuel liquid stops the shell fragments from reaching the boiler room. Though the shell hits 2, 3, 4, and 5 struck farther forward and aft of this frame the cross section can be used to show how hits to the casemate armor devastate her watertight integrity. Her upper deck of 19 mm NS steel and the main deck of 7.6 mm NS steel are incredibly thin for World War II standards. It would normally take 63 mm of STS armor to stop BB caliber fragments and by World War II NS steel is not considered armor grade. The 63.5 mm of CNC armor added to the middle deck during modernization provided no protection because the shell detonated beneath it and the armor did not extend to the tip of the slope where the shell penetrated. When you also add in secondary explosions from ready ammunition lockers and severe fires her upper decks have lost watertight integrity.
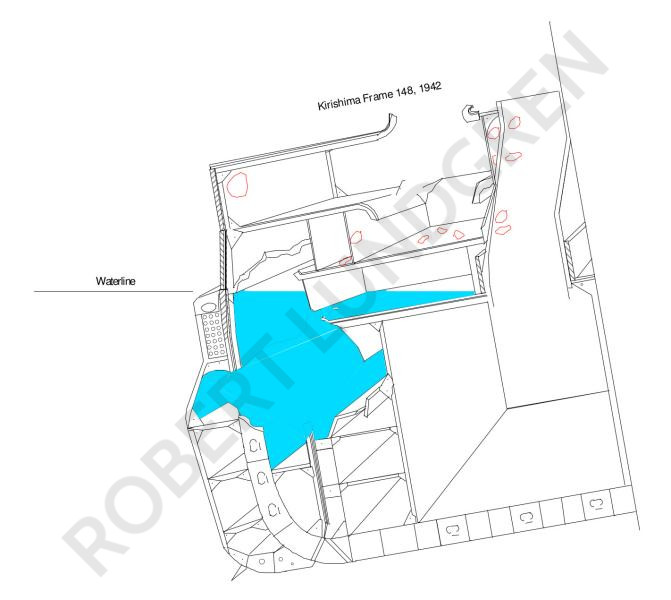
Then assume a 10 degree list to starboard and settling a few feet and the cross section shows how the middle deck begins to flood and the main deck is threatened by flooding if she settles further in the water.
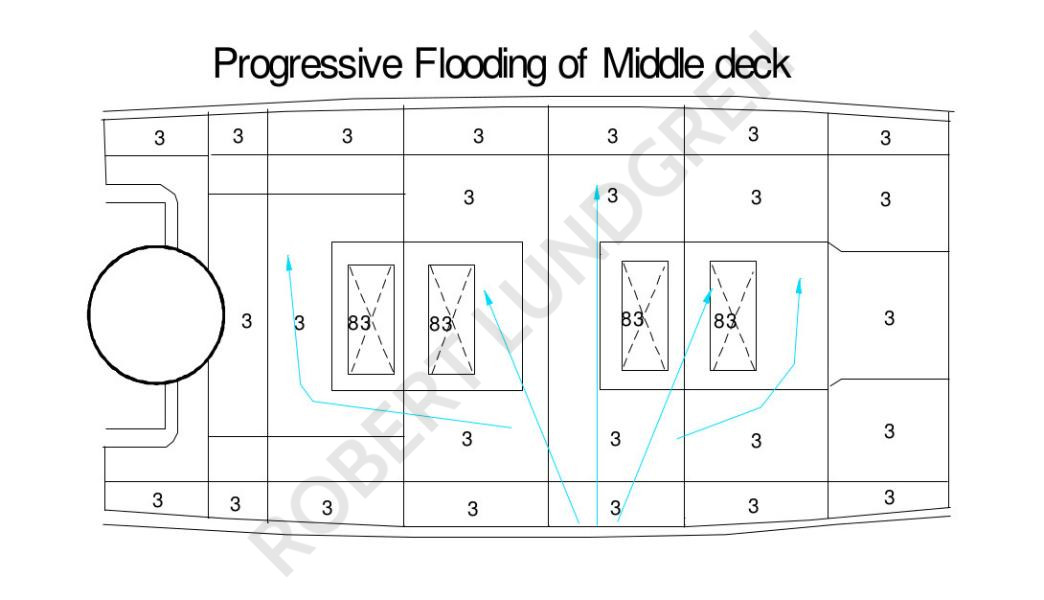
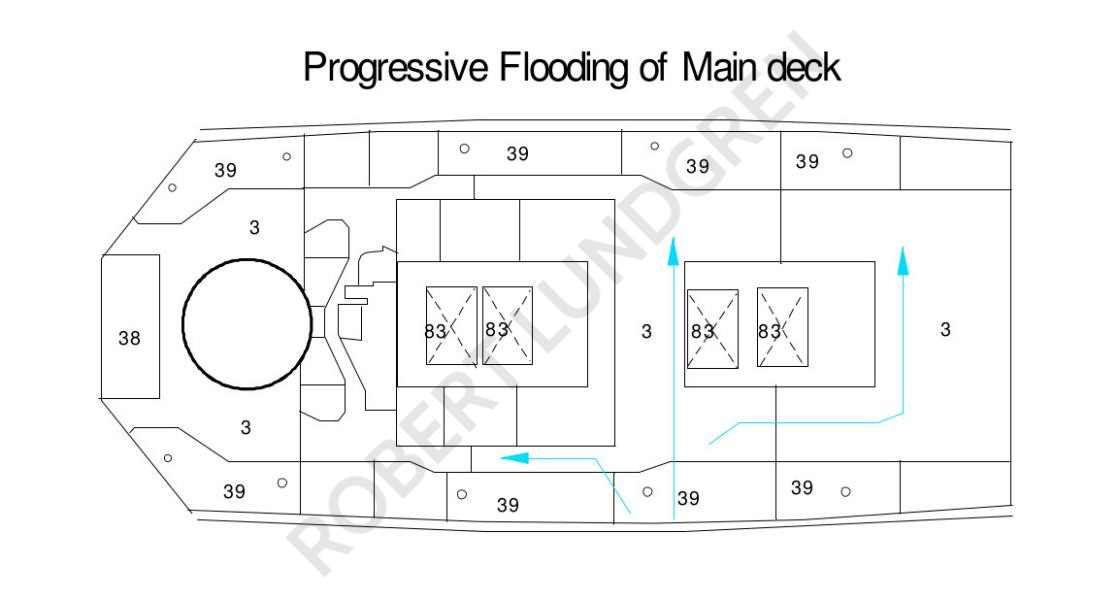
Now look at the plan views of the middle and main decks to show how such progressive flooding produces a massive free surface effect that can travel from starboard to port.
When the XO Commander Koro One ordered port voids flooded to correct the starboard list it only settled the ship lower in the water bringing her entire middle deck below the waterline and allowed the beginning of progressive flooding of the middle deck. When more progressive flooding occurred she will flip over to a port list and the XO ordered more starboard voids flooded which again simply settles the ship lower and allows more water onto her upper decks and she flops back to starboard. Eventually, flooding the port voids will not correct the starboard list but only increase the rate of flooding from starboard and the starboard list steadily grew.
What the Japanese officer testimony described is a classic case of a warship developing a negative GM with off center flooding. Damage to the underwater body of the ship has the same effect on reserve buoyancy as added weight has, since the result is the added weight of the flooding water. If the damage extends above the waterline after the ship has settled to its new position in the water, an additional loss of reserve buoyancy is present. This additional loss is due to the destruction of the watertight envelope of the ship. Further sinking or rolling of the ship will not immerse a buoyant volume but instead will result in the addition of more flooding water and a further loss of stability. A ship with a negative GM and off center flooding can be recognized by an excessive list for the known off center weight, a logy or sluggish slow roll about a given list angle, or a flop from side by side with a greater angle of the list to one side. The most probable cause for a negative GM in warships is loose water. An attempt to reduce the list by correcting for off-center weight first may cause the ship to flop to an even greater angle of list to the other side or even to capsize. Any use of ballasting or shifting weights must take into account the free surface effect as additional water is being taken into the ship and a further loss of reserve buoyancy must be acceptable. Proper corrective actions must first be made for the negative GM however in order for this to be effective, the hole allowing the water to enter must be completely plugged. Kirishima's turtle deck design where the middle deck slopes down and attaches to the bottom of the main belt insures that these holes would only be accessible to divers being totally submerged rather quickly. This makes them incredibly difficult to plug if not impossible and with her watertight envelop shattered she no longer has any reserve buoyancy and will eventually sink though it will take time due to the rather small hole of the 16-inch shells compared to a torpedo hit.
As Kirishima continued to list to starboard while the crew was abandoning ship Captain Iwabuchi did order the port engine room flooded as all exterior port voids had already been flooded to attempt to correct for the off center weight and bring her back to an even keel. In my opinion her officers followed a script when it came to damage control automatically giving orders to counter flood each time she took a list. It is documented she suffered considerable flooding but also her main machinery was completely intact. This damage analysis is a bit more than speculation because this is the only area of the ship which can produce the type of flooding, free surface effect, and for her to develop a negative GM. This level of damage must occur to match the officer testimony of how she sank. Unfortunately, the expedition did not film this far forward on her starboard side but the hit should be here waiting to be filmed. The hits farther forward and aft are in much more compartmentalized areas of the ship and would not produce the level of flooding on their own to produce the effects reported by her officers though they certainly contributed to her condition. There is no documentation that Captain Iwabuchi ordered any other machinery compartments flooded other than the port engine room at the very end. As this compartment flooded she settled further and the water on the upper decks began to shift from starboard to port. The free surface effect increases as the shift in weight increases and reaches speeds that cause her to lurch to port and this overwhelms her righting arm and she can not stop rolling to port and capsizes just like what has been documented by her officers.
Captain Iwabuchi may not have communicated his order to flood the port engine room to others and maybe in particular to the two destroyers along side. I do not believe he understood the true condition of his ship and simply was attempting to correct the starboard list which had become so great it was difficult to stand. He was in the process of having his crew abandon ship in an almost ceremonial procedure where the Emperor's portrait is removed first, then the wounded, and then crew by division. With two of the Emperor's destroyers alongside and in the vary process of accepting his crew, it would be a incomprehensible act to give orders to purposely sink the ship and threaten the lives not only of his own crew but also the two destroyers and their crews. There is no real evidence of any scuttling order, just an attempt at counter flooding on a ship with a negative GM which Iwabuchi did not understand at the time.
Her sudden capsizing certainly caught him by surprise and he was lucky to survive. There is no case during WORLD WAR II of the Japanese ever attempting to scuttle a major capital ship in this way and I do not believe Iwabuchi would have left Japanese doctrine.
Lee's observation of 8 hits is certainly reasonable since shell splashes could not be counted. Many hits are side by side and again the dispersion at these ranges will be incredibly small. Kirishima taking 19 hits to starboard only presents her starboard side from 0100 to 0105. Therefore, based upon Washington's documentation we can conclude that Kirishima took the majority of her damage between 0100 and 0105. .
The port rudder jam had to occur at 0107 when she pulls to port despite her rudders already being jammed at 10 degrees starboard. The range of visibility at the time Washington was shooting was only 6,000
yards after the moon set at 0058. Washington remains outside this range for the entire period she is shooting. Shell splashes would obscure what could be seen and shells landing so close to each other at the same time would be very difficult to distinguish as separate hits. Hit one was observed as a single hit.
Hits 2-3, 4-5, and 8-9 may have been counted as single hits. Hits 12, 13, 14 may have been counted as two hits. Hit 10 is far enough separated to count as a single hit so what Lee observed would be a total of 8 hits. Hits 6, 7, 11, 15, 16, 19, and 20 all struck the water first and would have therefore been counted as misses. Even if they could count shell splashes, it would only bring the hit count to 13. It should be totally reasonable that any US estimate on shell hits be low since they would have had no knowledge of any hits below the waterline and would have counted these as misses.
When one looks at the documentation and the film of her wreck, there is significant evidence to support Hayashi's and Ikeda's account of Kirishima's battle damage as being highly accurate. He was the Chief Damage Control Officer and on the film there is no evidence of damage outside the locations where he said there would be damage. Since Kirishima is sunk into the mud just short of her waterline, the damage to her casemate mounts is sunk in the mud. This also includes three of the hits aft which are below the mud line. All damage forward is gone due to some form of magazine explosion. The expedition only partially filmed the wreck but in the area they did film there are three direct hits and the rudder damage should be visible. These are 7, 15, 16, and 20. All are right where they should be.
This is just one theory on why Kirishima looks the way that she does today and by no means represents the only possibility. What follows is a list of facts that I used when developing this theory.
- Kirishima capsized due to a loss of stability and a negative GM.
- Kirishima had taken considerable flooding on her upper decks but her machinery compartments were largely air filled when she sank.
- Captain Iwabuchi had ordered all forward and aft powder magazines flooded before she capsized.
- Captain Iwabuchi ordered the port engine room flooded in an attempt to correct the starboard list right before she capsized. The starboard engine room was suffering from progressive flooding and her stern had taken major shell damage. This flooding combined caused her to plunge by the stern once she did capsize.
- Her main battery turrets would have fallen out due to their own weight once she did capsize. The Kongo class had no locking mechanism for their turrets like the Nagato class did.
- There is no record of an explosion after she left the surface by the Japanese.
- Kirishima sank at 0323 on 15 November 1942.
- The survivors of the US destroyer Preston in the water awaiting rescue document that four successive explosions took place at approximately 0400 in the direction west of Savo Island where Washington had hit a Japanese ship, setting her on fire.
- By 0400 the Japanese had left the area.
- Kirishima's hull is broken roughly in the area of her forward superstructure.
- Kirishima's stern is broken off at the very tip.
- Kirishima's forward anchor chain is draped over the stern section across her outboard propellers.
- Kirishima lies in about 3,500 feet of water or just over four ship lengths.
- Hundreds upon hundreds of main and secondary powder casings were found in the debris field but not a single shell.
- There are no large objects within the debris field or even near the stern section on sonar. It appears that the bow section was completely destroyed. What remains are shattered sections of twisted metal.
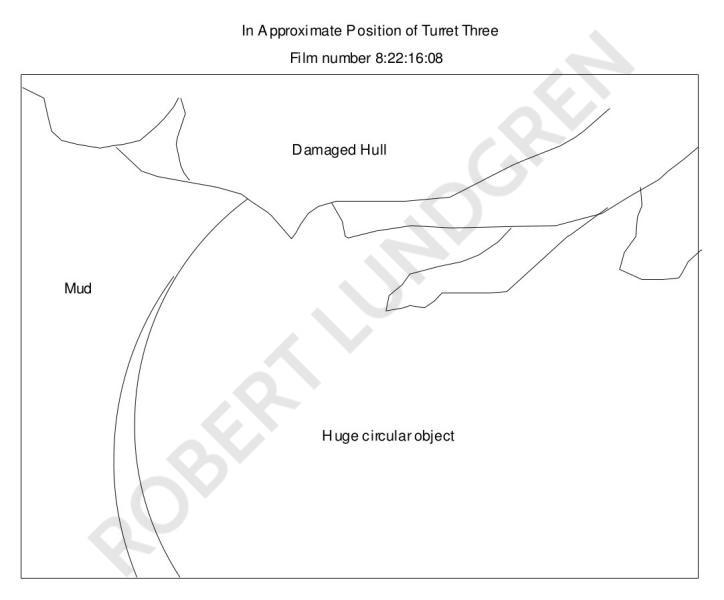
- Kirishima lies on a perfectly circular object in the location of turret three that is only slightly above the mud. Though its identification is not confirmed it is possible that this is turret three and the weight of the ship has pushed it down into the mud. What is sticking out is the bottom of the rotating structure covered by mud.
- None of the four turrets were found in the debris field and the ship may have landed on top of them.
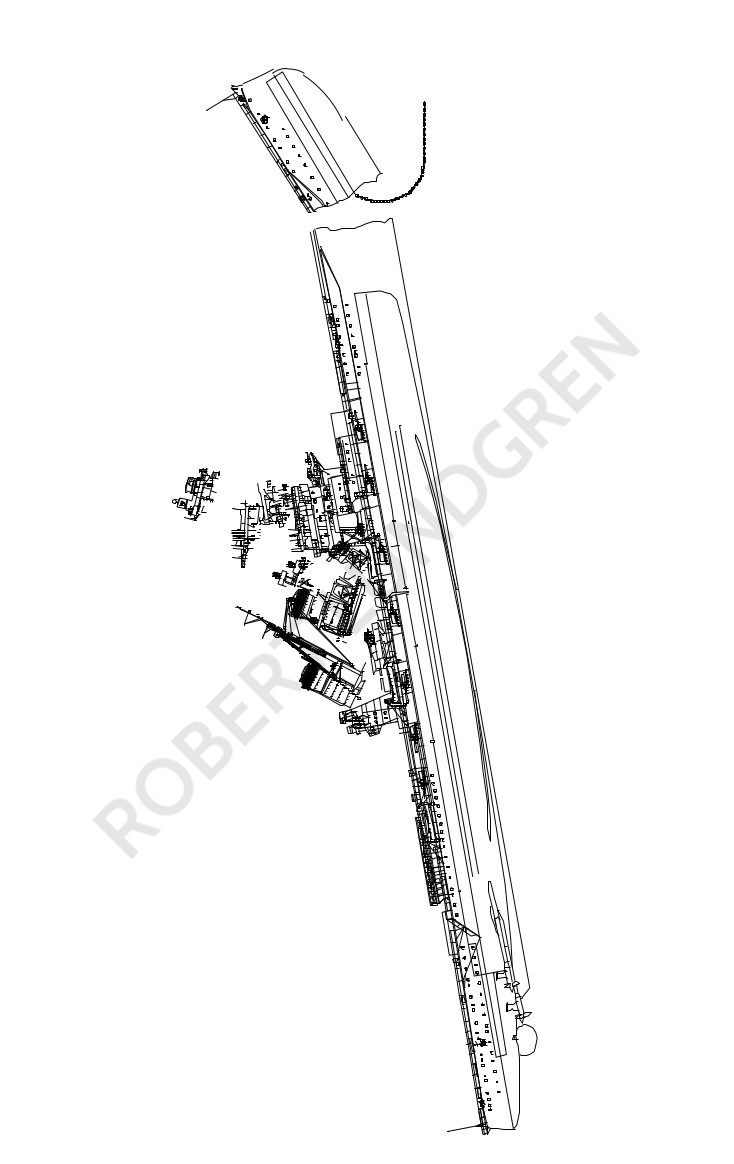
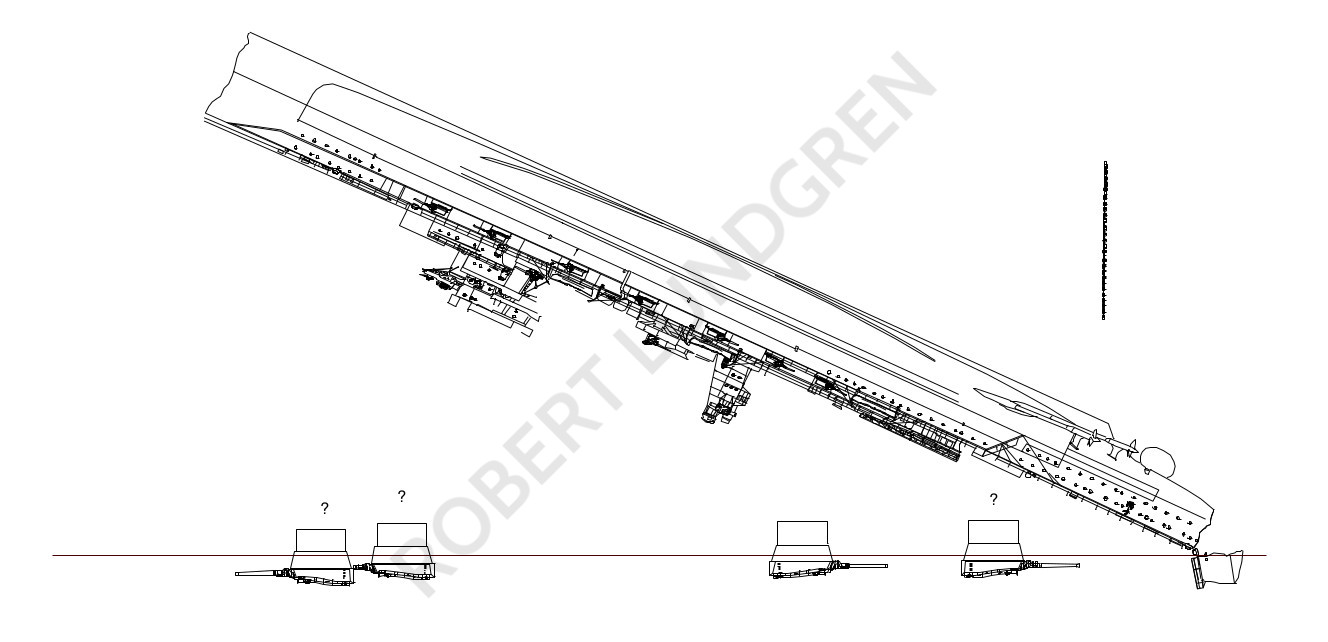
The following diagrams show what I think may have happened;
-
Kirishima capsizes and her four main battery turrets fall out.
-
Kirishima plunges by the stern and sinks in a nearly vertical position. Her bow remains largely air filled forward and wants to remain at the surface but her hull fails where she took a direct hit at the forward chain locker and begins to spill out this chain. Her stacks and superstructure begin to fall away as she plunges and it is unknown what condition her Pagoda superstructure would remain in as she sank but it too may have taken significant damage and broken up on the decent due to other parts of her superstructure slamming into it, any destruction of the tripod supports could seriously break up the rather simple platform decks the Pagoda is built up on. In the case of USS Northampton her tripod mast actually imploded but the debris field is filled with so many small pieces of junk that what remains of Kirishima's superstructure could not be identified.
-
Kirishima lands on her stern, burying the tip into the mud which then breaks off. Turret three lands in the mud and the other turrets may have also landed in the approximate positions they used to be in and the hull simply lands on top of them and when it does pushes them deeper into the mud because of the weight of her hull. The chain falls down towards the stern.
-
Kirishima lands upside down because there was not enough time before her stern hit the bottom for her machinery compartments to completely flood so she retains a negative GM until after she lands. The anchor chain simply falls over the stern in the position of the outboard propellers but is largely in huge clumps off to starboard across the sea floor. This may be due to the largely air filled bow drifting away from the hull to starboard keeping one end of the chain raised instead of the total amount spilling out in one location and then the bow settling some distance from the stern section. The chain is not wrapped around the propellers but simply draped. Her machinery compartments progressively flood through her ventilation shafts but there are still pockets of air filled compartments within her hull. She has landed largely intact and will remain this way for at least 40 minutes after she hit bottom. One air filled compartment may be her forward secondary shell magazine which is represented by the red square.
-
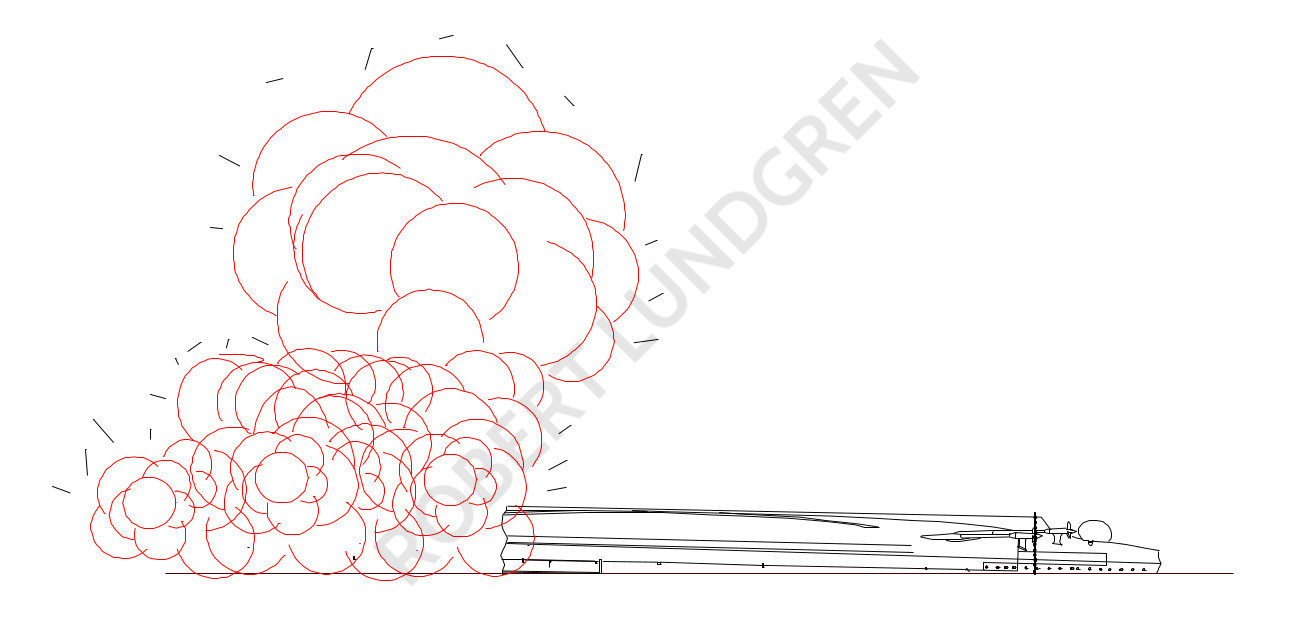
Now resting on the bottom, the pressure within the hull on any air filled compartment is roughly 1,633 psi. If these compartments flood in a progressive manner the air will be forced out slowly and the pressure on the compartment will equalize as it floods. However if a compartment suffers a sudden and complete decompression caused by bulkheads collapsing, then the shock will be tremendous as all that pressure is released at once. Within her secondary shell magazine are literally thousands of 6-inch and 5-inch common projectiles filled with an explosive filler Shimose or picric acid. This explosive filler is very sensitive to shock and if this compartment suffered a sudden decompression it would only take one shell to start the chain reaction among thousands. I suspect that roughly 40 minutes after she sank one of her secondary shell magazines exploded due to a sudden decompression of the compartment.
- Kirishima was loaded for a bombardment mission meaning she would have been loaded with more HC shells than AP shells. It will not matter if her main shell magazines had already flooded the shells would still detonate under the shock of adjacent exploding secondary magazines. Preston's crew documented four successive explosions at roughly 0400. The gas bubble being produced within her hull directly below her keel would shatter the hull as each shell magazine explodes moving forward. Her powder magazines now above the shell rooms contain thousands of main and secondary casings but the powder will not burn underwater so the casings are simply thrown up and then they fall back down over the debris field which is what is on the film. Every shell within her forward magazines is consumed and the bow section completely destroyed. In this condition she will remain and this is how Dr. Ballard found her some 50 years later close to the anniversary of her sinking. This wreck is without doubt Kirishima.
- ^USS Washington's action report and VAdm Lee's report to Adm. Nimitz.
- ^JT 1 Troms and ARs of battleship and cruisers.
- ^Fading Victory: The Diary of Admiral Matome Ugaki.
- ^Senkan Kirishima no Saigo (Last of Battleship Kirishima) 1987 written by Lt.(jg) Michio Kobayashi.
- ^Senkan Kirishima no Saigo (Last of Battleship Kirishima) 1960 written by Lt.Cdr. Kyshichi Yoshino.
- ^Shikikan-tachi no Taiheiyô Sensô [Pacific War as Described by the Senior Officers], Shishi Ruirui (Heaps of Corpses) written by Lt. Cdr. Tsurukichi Ikeda.
This article is copyrighted 2010 - 2017 by Robert Lundgren and is reproduced on NavWeaps.com with permission.
The article was transcribed for the internet by Tony DiGiulian.

